Feral Druid Compendium
Written by: Crazymeow
News
11.1 Tier Set
2p: Your spells and abilities have a chance to activate a Winning Streak increasing the damage of your Ferocious Bite, Rip, and Primal Wrath by 3% stacking up to 10 times. Ferocious Bite, Rip, and Primal Wrath have a 15% chance to remove Winning Streak!. Free Ferocious Bites are exempt from this chance.
4p: When you consume ![]() Apex Predator's Craving, become a Big Winner, dealing (800% of Attack power) Physical damage to Apex Predator's primary target and increasing the damage of your periodic effects by 16% for 6 sec.
Apex Predator's Craving, become a Big Winner, dealing (800% of Attack power) Physical damage to Apex Predator's primary target and increasing the damage of your periodic effects by 16% for 6 sec.
The 2p is worth ~2.1% dps, 2p+4p is worth ~7.1% dps. While this is on the weaker side for 11.1 tier sets, we will still equip 2p2p as long as the new 2p is of hero-track or better. (Sim your character to be certain)
Talent Builds
All talent builds will now contain ![]() Apex Predator's Craving once we acquire the new 4p. Switching to this new tier set also means we are likely playing Wildstalker for most if not all bosses in this raid. In other words, Wildstalker will be the default raid hero tree, and Druid of the Claw will be the default mythic+ tree. Additionally, the Druid Class Tree has been updated. Like usual, make sure to grab the throughput nodes first, and then whatever you may need for the fight afterwards.
Apex Predator's Craving once we acquire the new 4p. Switching to this new tier set also means we are likely playing Wildstalker for most if not all bosses in this raid. In other words, Wildstalker will be the default raid hero tree, and Druid of the Claw will be the default mythic+ tree. Additionally, the Druid Class Tree has been updated. Like usual, make sure to grab the throughput nodes first, and then whatever you may need for the fight afterwards.
Rotation
Single Target

What is a priority list?
When reading the priority lists below, you should not think about these as steps to follow in a specific order. At any given point in combat, you should cast the first thing in the list that you are able to cast.
The way this section is written is very formulaic and has the same structure as the Action Priority List (APL) used in sims.
Pre-Combat:
 Bear Form incredibly minor dps gain for the opener, you can just sit in Bear Form until about to pull, and then use
  Prowl to instantly shift into
  Cat Form.
- Prowl
 Rake from stealth.
Select which talents you have to filter the priority list:
TIP
Uncheck ![]() Bloodtalons if you want a simpler builder priority.
Bloodtalons if you want a simpler builder priority.
Single Target Priority List:
Highest Priority: Cooldowns
 Tiger's Fury at 5 combo points or if you're missing 35+ energy, whichever happens first.
-
 Ferocious Bite with
  Apex Predator's Craving procs if it won't disrupt procing
  Bloodtalons.
 - Ferocious Bite with Apex Predator's Craving procs.
-
 Adaptive Swarm when:
-
 Rip is up. AND
 - There isn't an Adaptive Swarm heading to your target, AND
- Adaptive Swarm is either missing or about to expire with 1/2 stacks. For example, with 3 stacks, you would refresh as soon as Adaptive Swarm falls off.
-
- Adaptive Swarm conditions change based on the amount of Adaptive Swarms you have out:
- If you have 3 Adaptive Swarms with at least 2 stacks out, then you will target allies with priority 1 stack > 0 stack > 2 stacks.
- If you have 2 or fewer Adaptive Swarms of at least 2 stacks, cast on your enemy target when swarm is not on them, and is not traveling towards them.
- If you have 3
-
 Incarnation with Tiger's Fury.
 -
 Berserk with Tiger's Fury. You can hold this for
  Convoke if for whatever reason they are misaligned, and you won't lose a cast doing so.
 -
 Feral Frenzy with 1 or no combo points. 2 combo points is also acceptable during Incarn.
 - Feral Frenzy with 1 or no combo points. 2 combo points is also acceptable during Berserk.
- Convoke when:
- Rip is up. AND
- Tiger's Fury is up. AND
- You have 2 or fewer combo points outside Berserk or 3 or fewer inside Berserk.
- You may also Convoke if the fight is about to end. Usually you want to Convoke with Berserk if you can do so without losing a cast.
Second Priority: Finishers
- As Wildstalker there are 2 scenarios where you can use 3+ combo point rips:
- Rip is in pandemic range near the start of Tiger's Fury
- Rip wont last until the next Tiger's Fury in the last 3 seconds of Tiger's Fury
- Rip if all of these are true:
- You have 5 combo points.
- Rip is missing or in pandemic range.
- Tiger's Fury is up, or won't be up before Rip expires.
- Bloodtalons is up.
- Ferocious Bite when:
Last Priority: Generators
-
 Shadowmeld into Rake if all of these are true:
- You do not have a
 Sudden Ambush proc.
 - Rake is in pandemic OR you would be upgrading Rake's snapshot value.
- Tiger's Fury is up.
- You do not have a
- Rake if any of these are true:
- Rake is in pandemic and Tiger's Fury is up.
- Rake is in pandemic and will expire before Tiger's Fury is up. Delay as long as reasonable if you are downgrading its snapshot value.
- You are in stealth.
- You have a Sudden Ambush proc, and you would be upgrading Rake's snapshot value.
- Rake if you are not in Incarn/Berserk and any of these are true:
- Rake is in pandemic and Tiger's Fury is up.
- Rake is in pandemic and will expire before Tiger's Fury is up. Delay as long as reasonable if you are downgrading its snapshot value.
- You are in stealth.
- You have a Sudden Ambush proc, and you would be upgrading Rake's snapshot value.
- Use Shred with Sudden Ambush procs during Incarn/Berserk
- Use
 Brutal Slash if it will cap on charges within the next 4 seconds.
 - Use Lunar Inspiration
 Moonfire if it is in pandemic.
 - Cast
 Thrash if it is in pandemic range, outside of Incarn/Berserk
  Shred with
  Clearcasting procs.
- Brutal Slash.
- Shred.
- If you still need Bloodtalons proc it with this priority:
Multi Target

What is a priority list?
When reading the priority lists below, you should not think about these as steps to follow in a specific order. At any given point in combat, you should cast the first thing in the list that you are able to cast.
The way this section is written is very formulaic and has the same structure as the Action Priority List (APL) used in sims.
Pre-Combat:
- Adaptive Swarm
- Prowl
- Rake from stealth.
Select which talents you have to filter the priority list:
TIP
Uncheck ![]() Bloodtalons if you want a simpler builder priority.
Bloodtalons if you want a simpler builder priority.
AoE priority list (2+ targets):
Highest Priority: Cooldowns
Special Note: Use single-target spells on higher priority/higher healthed mobs
- Tiger's Fury at 5 combo points or if you're missing 35+ energy, whichever happens first.
- Ferocious Bite with Apex Predator's Craving procs if it won't stop Bloodtalons from proccing.
- Ferocious Bite with Apex Predator's Craving procs.
- Adaptive Swarm when all of these are true:
- There isn't an Adaptive Swarm heading towards your target.
- Adaptive Swarm is not on your target.
- Rip's from
 Primal Wrath are up.
- There isn't an
- With Unbridled Swarm talented, use Adaptive Swarm as often as you can with this priority:
- An enemy target has 2 stacks of Adaptive Swarm.
- An enemy target has 1 stack of Adaptive Swarm.
- An enemy target does not have Adaptive Swarm.
- An enemy target has 2 stacks of
- Incarnation. This should always be paired with Tiger's Fury.
- Berserk. This should always be paired with Tiger's Fury.
- Feral Frenzy with 1 or no combo points outside Incarn, or 2 or fewer inside Incarn.
- Feral Frenzy with 1 or no combo points outside Berserk, or 2 or fewer inside Berserk.
- Convoke when:
Second Priority: Finishers
- Ferocious Bite at 5 combo points and both of these are true:
- If inside Incarn/Berserk, Primal Wrath is not in pandemic. Otherwise Rip's from Primal Wrath have at least 6.5s remaining.
- You have a
 Ravage proc and there are fewer than 8 targets.
 - A target has
 Bloodseeker Vines and there are fewer than 7 targets.
- If inside
- Primal Wrath with 5 combo points if any of these conditions are met:
- Rip's from Primal Wrath have 6.5 seconds or less remaining outside of Incarn/Berserk.
- Rip's from Primal Wrath are missing or in pandemic range inside Incarn/Berserk.
- There are 2 or more targets.
-
- Rip on targets without Rip that will live for a decent amount of time.
- Please, I beg you, if you are using Rip on multiple targets; you should seriously be talenting Primal Wrath. It's as close to mandatory as it gets.
- Please, I beg you, if you are using
- Ferocious Bite at 5 combo points with either 50 energy or inside Incarn/Berserk.
Last Priority: Generators
- Thrash if it's either missing or in pandemic range.
- During Incarn/Berserk, Brutal Slash if you have any charges. Yes ignore Bloodtalons for this.
- During Incarn/Berserk, Brutal Slash if you have any charges starting at 3t. Yes ignore Bloodtalons for this.
- During Incarn/Berserk, ignore Bloodtalons and
 Swipe.
 - During Incarn/Berserk, ignore Bloodtalons and Swipe starting at 3t.
- Brutal Slash if it will cap on charges within the next 4 seconds, or mobs will die in the next 4 seconds.
- Swipe if there are 5 or more targets.
- Prowl into Rake on a target where Rake is either missing, in pandemic range, or can be upgraded as long as you don't have a Sudden Ambush proc.
- Prowl into Rake on a target where Rake is either missing, in pandemic range, or can be upgraded.
- Shadowmeld into Rake on a target where Rake is either missing, in pandemic range, or can be upgraded as long as you don't have a Sudden Ambush proc.
- Shadowmeld into Rake on a target where Rake is either missing, in pandemic range, or can be upgraded.
- Refresh Rake's that are either missing, or in pandemic range if you're not capped on Clearcasting stacks.
- Swipe if there are 3 or more targets.
- Rake if you have no Rake's out. We want at least one Rake rolling for the sake of proccing Bloodseeker Vines.
- Refresh
 Moonfire's that are either missing, or in pandemic range if you're not capped on Clearcasting stacks.
 - Rake if it's either missing, or in pandemic range.
- Brutal Slash
- Swipe
- Swipe
- Shred if Sudden Ambush is not up.
- Shred
- Thrash
- If you still need Bloodtalons, proc it with this priority:
- If you have a Sudden Ambush proc, Rake the target with the lowest remaining Rake duration.
- Lunar Inspiration Moonfire on the target with the lowest remaining Moonfire duration.
- If you have a Sudden Ambush proc, Rake the target with the lowest remaining Rake duration.
- Shred
- Rake a target without a Pouncing Strikes snapshot.
- Thrash
- If you have a
Talents
Class Tree (all pve content)

Talent Explanations
Purple Choice Options Explained
![]() Lore of the Grove: If you talent
Lore of the Grove: If you talent ![]() Lunar Inspiration, you should be talenting this as well.
Lunar Inspiration, you should be talenting this as well.
![]() Remove Corruption: Always take if you need poison or curse dispel, which is not every dungeon, and isn't all that common in raid either.
Remove Corruption: Always take if you need poison or curse dispel, which is not every dungeon, and isn't all that common in raid either.
![]() Nurturing Instinct: You put points into this if you are playing
Nurturing Instinct: You put points into this if you are playing ![]() Lunar Inspiration (or technically
Lunar Inspiration (or technically ![]() Convoke) and have nothing else to put points in. It is an extremely minor dps increase.
Convoke) and have nothing else to put points in. It is an extremely minor dps increase.
![]() Feline Swiftness: You only drop this if you need another talent point to play something else, and value the
Feline Swiftness: You only drop this if you need another talent point to play something else, and value the ![]() Well-Honed Instincts proc over movement speed
Well-Honed Instincts proc over movement speed
![]() Well-Honed Instincts: Strong versus rot damage in particular, its main issue is that sometimes this will trigger when you don't need it to, and because of that it is less reliable.
Well-Honed Instincts: Strong versus rot damage in particular, its main issue is that sometimes this will trigger when you don't need it to, and because of that it is less reliable.
![]() Perfectly-Honed Instincts: Can take if there isn't anything else you want, or if the fight timers suit 90s cooldown better.
Perfectly-Honed Instincts: Can take if there isn't anything else you want, or if the fight timers suit 90s cooldown better.
![]() Incapacitating Roar: Often picked in keys as a soft-kick. Recently buffed so it won't break instantly. In raid this is pretty niche.
Incapacitating Roar: Often picked in keys as a soft-kick. Recently buffed so it won't break instantly. In raid this is pretty niche.
![]() Ursine Vigor: Mostly keys only talent for when you need a stronger
Ursine Vigor: Mostly keys only talent for when you need a stronger ![]() Bear Form. Occasional use in raid as well.
Bear Form. Occasional use in raid as well.
![]() Fluid Form: Highly recommended talent to reduce global wastage from shapeshifting. If you don't find yourself shapeshifting much, this talent is much less valuable.
Fluid Form: Highly recommended talent to reduce global wastage from shapeshifting. If you don't find yourself shapeshifting much, this talent is much less valuable.
![]() Typhoon: If you need a knock, or think the knock will be more useful than
Typhoon: If you need a knock, or think the knock will be more useful than ![]() Ursol's Vortex
Ursol's Vortex
![]() Ursol's Vortex: Excellent kiting tool that wont leave mobs spread out all over the place. Can also pair with
Ursol's Vortex: Excellent kiting tool that wont leave mobs spread out all over the place. Can also pair with ![]() Typhoon as a poor mans mass grip, or just to use typhoon as a soft-kick without splaying the mobs all over the place.
Typhoon as a poor mans mass grip, or just to use typhoon as a soft-kick without splaying the mobs all over the place.
![]() Mass Entanglement: More of a niche option compared to
Mass Entanglement: More of a niche option compared to ![]() Ursol's Vortex,
Ursol's Vortex, ![]() Mass Entanglement can be good if you want to root a group of mobs that the group does not intend to attack.
Mass Entanglement can be good if you want to root a group of mobs that the group does not intend to attack.
![]() Innervate: If your healer told you to talent this. Well that or you want
Innervate: If your healer told you to talent this. Well that or you want ![]() Nature's Vigil and/or
Nature's Vigil and/or ![]() Forestwalk.
Forestwalk.
![]() Nature's Vigil: Solid healing during your cooldown windows, especially in keys. Pair this with
Nature's Vigil: Solid healing during your cooldown windows, especially in keys. Pair this with ![]() Berserk a vast majority of the time. I would pick this a vast majority of the time with the Class Tree rework.
Berserk a vast majority of the time. I would pick this a vast majority of the time with the Class Tree rework.
![]() Forestwalk: Decent survivability bump, given that you're receiving healing. Stacks multiplicatively with other healing increases.
Forestwalk: Decent survivability bump, given that you're receiving healing. Stacks multiplicatively with other healing increases.
![]() Improved Stampeding Roar: Great in keys/world content for a more frequent movement cooldown between pulls; also frequently played in raids when you need
Improved Stampeding Roar: Great in keys/world content for a more frequent movement cooldown between pulls; also frequently played in raids when you need ![]() Stampeding Roar more often than every 2 minutes.
Stampeding Roar more often than every 2 minutes.
![]() Lycara's Meditation: If you have the points to spare and you will be shapeshifting a decent amount, this is just more damage. It is best in keys, where you often enter
Lycara's Meditation: If you have the points to spare and you will be shapeshifting a decent amount, this is just more damage. It is best in keys, where you often enter ![]() Bear Form.
Bear Form.
Niche Options Explained
![]() Matted Fur: If you have nowhere else to put your talent points, this technically does something. It's extremely weak, but technically a defensive increase.
Matted Fur: If you have nowhere else to put your talent points, this technically does something. It's extremely weak, but technically a defensive increase.
![]() Heart of the Wild: For cutting-edge levels of keys where you either need a stronger
Heart of the Wild: For cutting-edge levels of keys where you either need a stronger ![]() Bear Form to cover damage events, or just another charge of
Bear Form to cover damage events, or just another charge of ![]() Frenzied Regeneration.
Frenzied Regeneration.
![]() Hibernate: Almost exclusively used in keys, and rarely so. This is essentially a sap that only works on beasts and dragonkin, essentially you only chose this talent if you have a specific target to hibernate in mind.
Hibernate: Almost exclusively used in keys, and rarely so. This is essentially a sap that only works on beasts and dragonkin, essentially you only chose this talent if you have a specific target to hibernate in mind.
![]() Mighty Bash: If you don't need
Mighty Bash: If you don't need ![]() Incapacitating Roar but do need a single-target stun, and can afford to take this instead of
Incapacitating Roar but do need a single-target stun, and can afford to take this instead of ![]() Maim. In PvE,
Maim. In PvE, ![]() Mighty Bash is generally preferred over
Mighty Bash is generally preferred over ![]() Maim because it doesn't cost combo points and energy to cast, and is niche enough that the cooldown difference isn't as relevant.
Maim because it doesn't cost combo points and energy to cast, and is niche enough that the cooldown difference isn't as relevant.
![]() Maim: In PvE, maim is generally used as an emergency soft-kick as opposed to a stun, though you can use it that way as well. It has a short cooldown, and easy to acquire. Its main issue is how much dps you lose by casting it, relegating the spell to niche-tier. It also puts mobs on stun dr, which in some groups can be inefficient.
Maim: In PvE, maim is generally used as an emergency soft-kick as opposed to a stun, though you can use it that way as well. It has a short cooldown, and easy to acquire. Its main issue is how much dps you lose by casting it, relegating the spell to niche-tier. It also puts mobs on stun dr, which in some groups can be inefficient.
![]() Starfire ->
Starfire -> ![]() Moonkin Form: This is almost exclusively for access to
Moonkin Form: This is almost exclusively for access to ![]() Moonkin Form's
Moonkin Form's ![]() Wild Charge for when you cannot
Wild Charge for when you cannot ![]() Wild Charge inside
Wild Charge inside ![]() Travel Form. In world content,
Travel Form. In world content, ![]() Flap can be nice to have as well.
Flap can be nice to have as well.
![]() Astral Influence: Probably the most niche talent option there is for Feral Druids, this extends the range of
Astral Influence: Probably the most niche talent option there is for Feral Druids, this extends the range of ![]() Adaptive Swarm and
Adaptive Swarm and ![]() Lunar Inspiration for when 40 yards isn't enough but 45 yards is.
Lunar Inspiration for when 40 yards isn't enough but 45 yards is.
![]() Gale Winds: If you have the talent point to spare,
Gale Winds: If you have the talent point to spare, ![]() Gale Winds makes
Gale Winds makes ![]() Typhooning mobs easier when mobs are spread out.
Typhooning mobs easier when mobs are spread out.
![]() Incessant Tempest: If you find yourself in a scenario where you need to knock twice in less than 30 seconds, this talent lets you do that.
Incessant Tempest: If you find yourself in a scenario where you need to knock twice in less than 30 seconds, this talent lets you do that.
Raid Talents
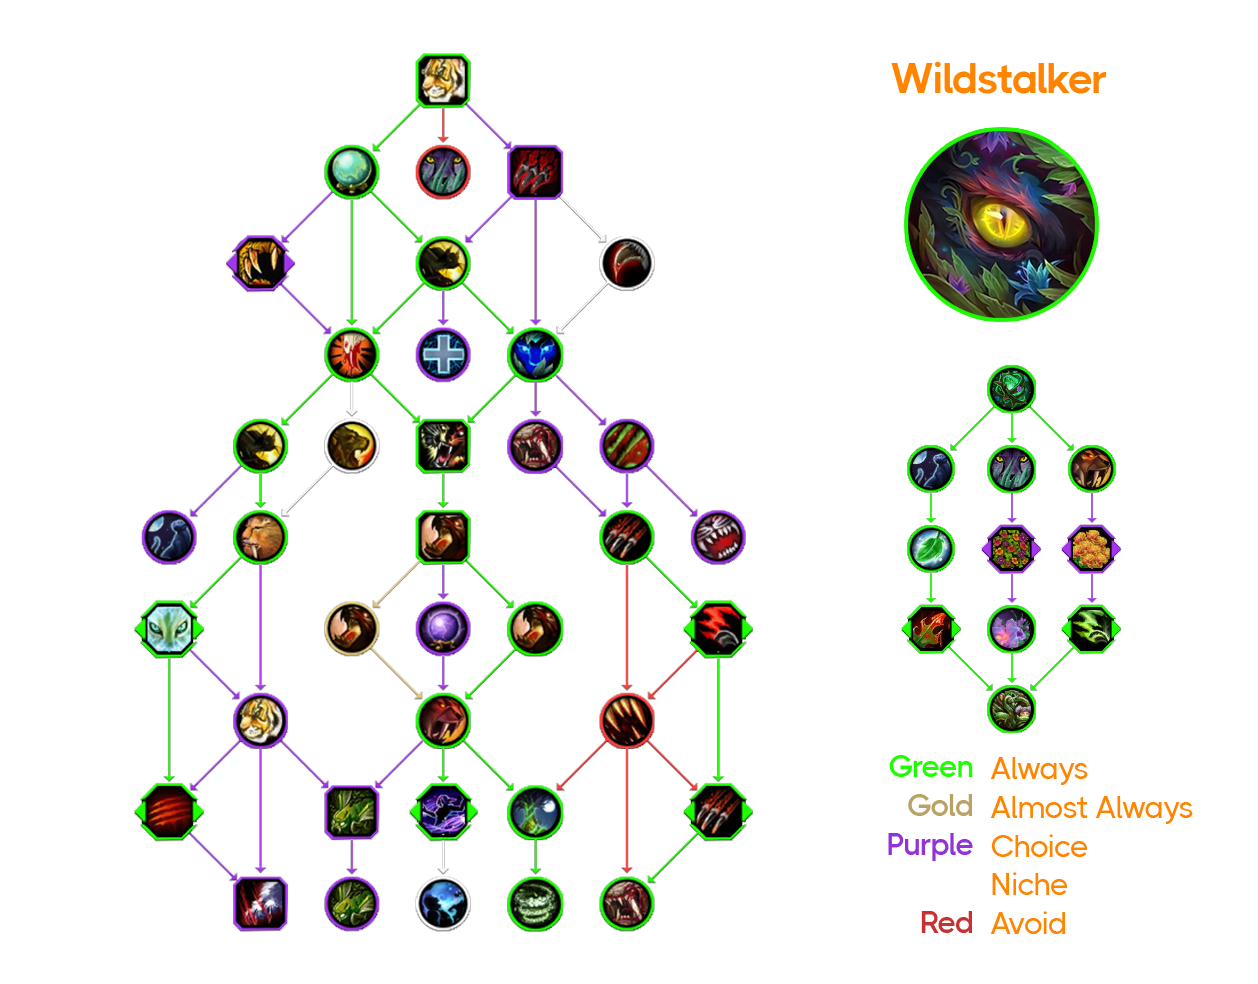
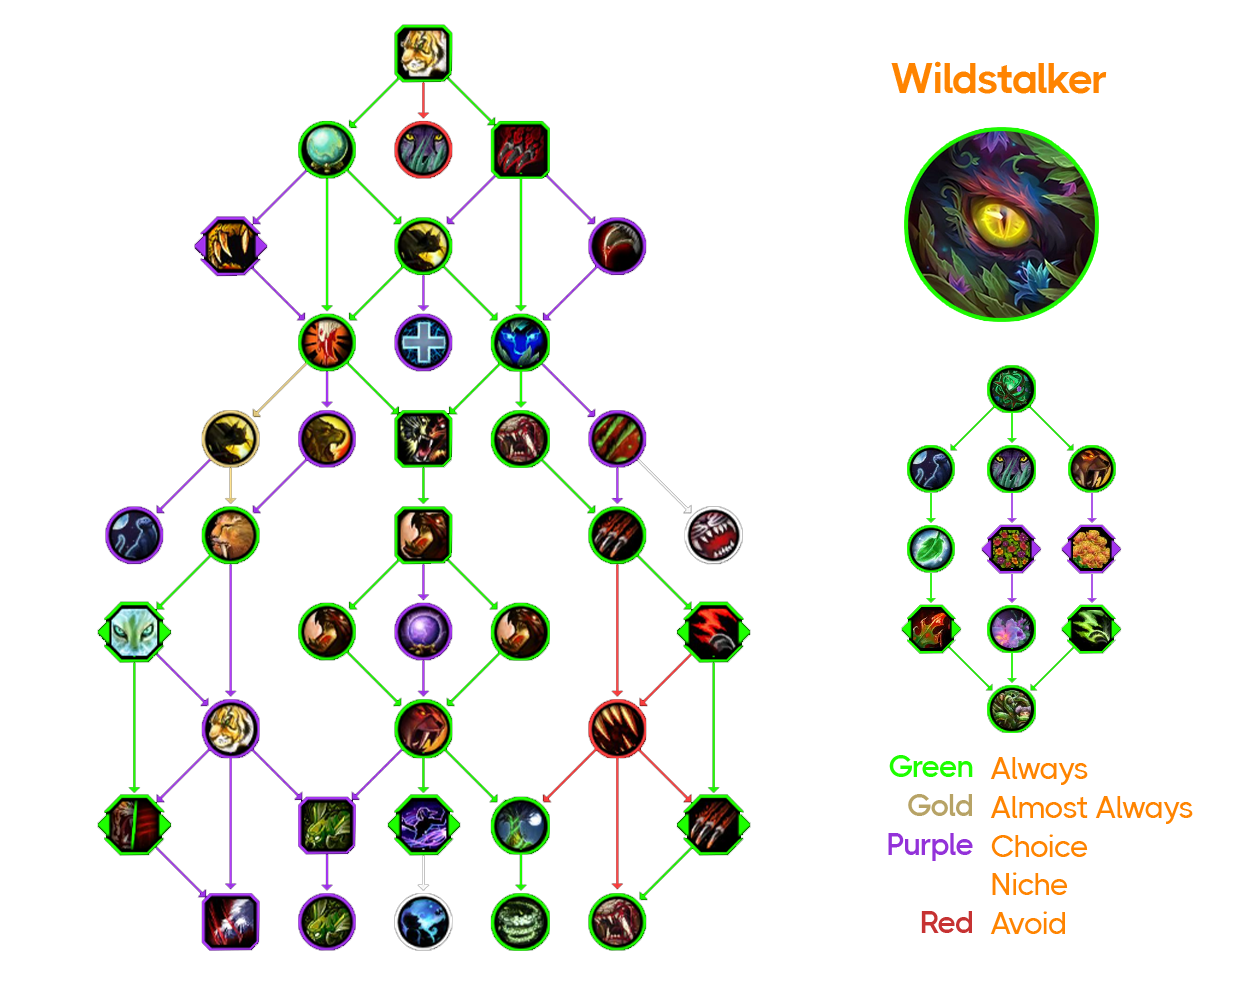
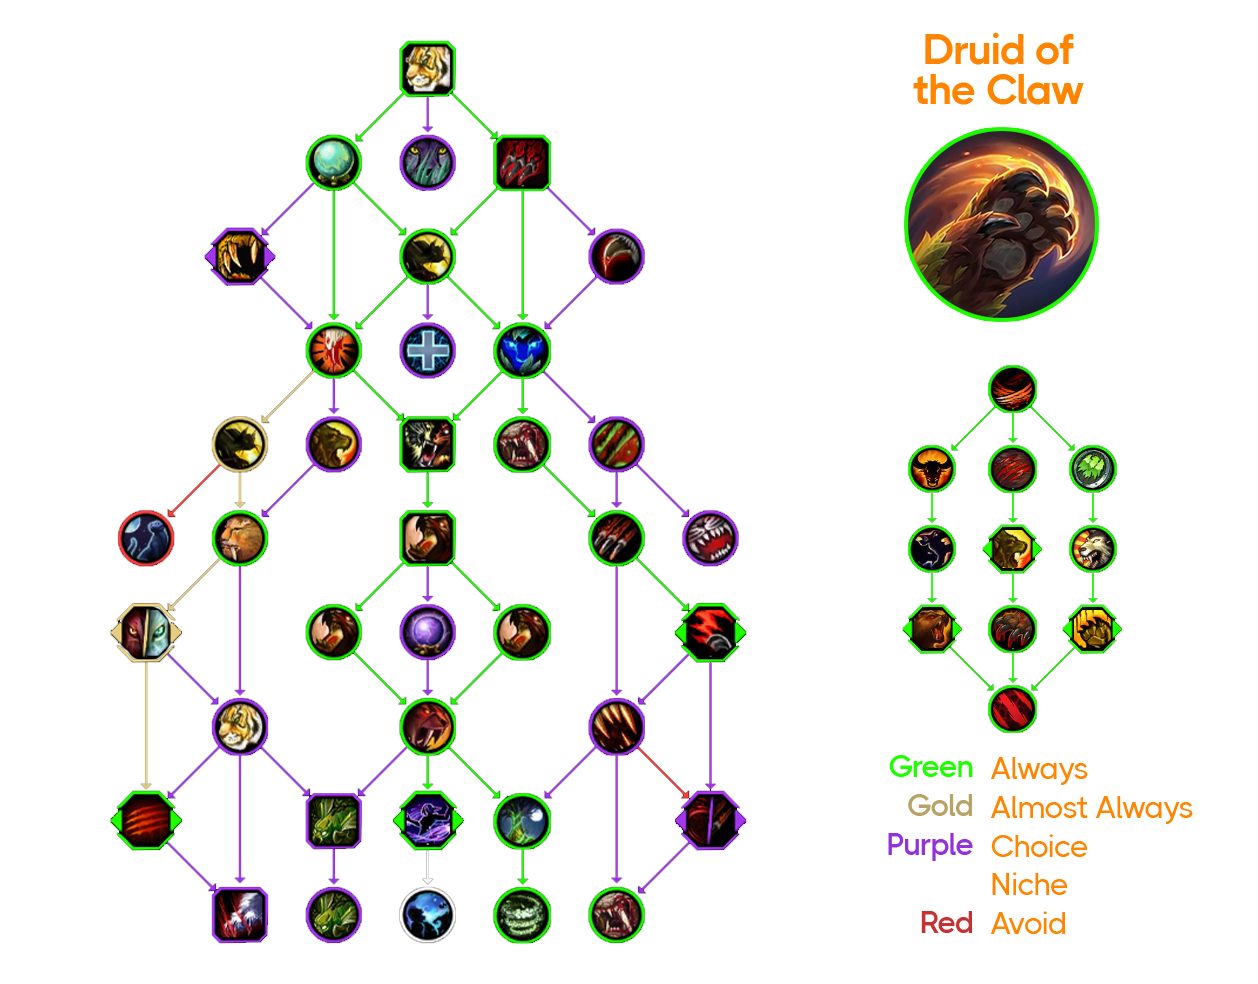
Our recommended default hero-tree for raiding is Wildstalker once you acquire at least the 2 piece 11.1 set bonus. That being said, Druid of the Claw may see some play on fights with AoE.
Mythic Liberation of Undermine Raid Builds
WARNING
This section is highly liable to change as we get more familiar with the fights.
Please note you can significantly customise the above, see the talent write-up in the following M+ section. Or take inspiration from the given Mythic Raid talents.
Dungeon Talents
Feral goes into 11.1 with plenty of options yet again when it comes to M+, with both Hero trees creating two distinct options on their own. Embrace these options and find what works for you, there is simply no 'best' build, especially because different talents will suit different dungeons and groups. However, listed below are some reference builds you can play around with, and the images below can help guide you to customise these builds to your liking.
That being said, Druid of the Claw is the better hero-tree for M+. Not that you can't play Wildstalker if you want to, it is just worse.
Talent Explanations
Section 1 Options Explained
![]() Tireless Energy: Less single target than
Tireless Energy: Less single target than ![]() Merciless Claws but equivalently more AoE damage as well.
Merciless Claws but equivalently more AoE damage as well.
![]() Double-Clawed Rake: Strong AoE only talent. Only reason its a choice is because this provides zero single-target value. Gains value with Wildstalker.
Double-Clawed Rake: Strong AoE only talent. Only reason its a choice is because this provides zero single-target value. Gains value with Wildstalker.
![]() Merciless Claws: This represents the most single target, the least AoE, and the most burst of the three options due to its synergy with
Merciless Claws: This represents the most single target, the least AoE, and the most burst of the three options due to its synergy with ![]() Berserk: Frenzy. Gains value with Druid of the Claw.
Berserk: Frenzy. Gains value with Druid of the Claw.
![]() Thrashing Claws: decent option if running Lunar Inspiration, frees up more globals to Moonfire more. Video guide here.
Thrashing Claws: decent option if running Lunar Inspiration, frees up more globals to Moonfire more. Video guide here.
Section 2 Options Explained
![]() Taste for Blood: Strong single-target and funnel (if a particular dungeon has priority mobs you want to funnel Apex procs into). Strong synergy with
Taste for Blood: Strong single-target and funnel (if a particular dungeon has priority mobs you want to funnel Apex procs into). Strong synergy with ![]() Convoke, and particularly Druid of the Claw in general. For Wildstalker this talent loses value as bite just isn't much of your damage. Usually if you want more single target, you would rather play
Convoke, and particularly Druid of the Claw in general. For Wildstalker this talent loses value as bite just isn't much of your damage. Usually if you want more single target, you would rather play ![]() Lunar Inspiration instead.
Lunar Inspiration instead.
![]() Infected Wounds: Solid all-rounder talent, particularly good if playing
Infected Wounds: Solid all-rounder talent, particularly good if playing ![]() Double-Clawed Rake and Wildstalker in general. Still solid as Druid of the Claw, though if you don't talent
Double-Clawed Rake and Wildstalker in general. Still solid as Druid of the Claw, though if you don't talent ![]() Taste for Blood, then
Taste for Blood, then ![]() Savage Fury is often favored due to burst whilst providing similar overall value.
Savage Fury is often favored due to burst whilst providing similar overall value.
![]() Sudden Ambush: Like
Sudden Ambush: Like ![]() Infected Wounds this is a solid all-rounder talent with synergy to
Infected Wounds this is a solid all-rounder talent with synergy to ![]() Double-Clawed Rake. It's almost always preferred over
Double-Clawed Rake. It's almost always preferred over ![]() Savage Fury though, but can rarely be dropped in dungeons with significant AoE, allowing
Savage Fury though, but can rarely be dropped in dungeons with significant AoE, allowing ![]() Savage Fury to shine.
Savage Fury to shine.
![]() Savage Fury: Great burst and great for larger pull sizes, however a bit less effective on single-target. Longer travel time between packs in some dungeons can give time for TF to reset, thereby giving talents like this higher overall uptime as well. Also of note, one of the m+ affixes this season gives cooldown reduction, which this talent greatly benefits from.
Savage Fury: Great burst and great for larger pull sizes, however a bit less effective on single-target. Longer travel time between packs in some dungeons can give time for TF to reset, thereby giving talents like this higher overall uptime as well. Also of note, one of the m+ affixes this season gives cooldown reduction, which this talent greatly benefits from.
![]() Lunar Inspiration: strong single-target and low target cleave as Wildstalker, and can help proc
Lunar Inspiration: strong single-target and low target cleave as Wildstalker, and can help proc ![]() Bloodtalons more often.
Bloodtalons more often.
![]() Moment of Clarity: Fairly strong single-target and an excellent all-rounder, can help if you are struggling with energy too. Unlike
Moment of Clarity: Fairly strong single-target and an excellent all-rounder, can help if you are struggling with energy too. Unlike ![]() Taste for Blood however, it's single target strength does not extend to funnel damage.
Taste for Blood however, it's single target strength does not extend to funnel damage.
![]() Raging Fury vs
Raging Fury vs ![]() Tiger's Tenacity: both are good for both Hero trees, Tiger's Tenacity is generally a bit better overall, particularly with DOT-focused builds, but Raging Fury is competitive and the added uptime can be useful depending on how long packs are living, or if you simply prefer playing with a higher uptime on
Tiger's Tenacity: both are good for both Hero trees, Tiger's Tenacity is generally a bit better overall, particularly with DOT-focused builds, but Raging Fury is competitive and the added uptime can be useful depending on how long packs are living, or if you simply prefer playing with a higher uptime on ![]() Tiger's Fury.
Tiger's Fury.
![]() Raging Fury/
Raging Fury/![]() Tiger's Tenacity cont.: You can technically drop this node, if and only if you're playing 2x
Tiger's Tenacity cont.: You can technically drop this node, if and only if you're playing 2x ![]() Carnivorous Instinct anyway as Druid of the Claw. This nets a small gain in Single Target in exchange for a small loss in AoE. I find this an odd trade-off if you're full sending
Carnivorous Instinct anyway as Druid of the Claw. This nets a small gain in Single Target in exchange for a small loss in AoE. I find this an odd trade-off if you're full sending ![]() Carnivorous Instinct though, so marked not playing this as niche.
Carnivorous Instinct though, so marked not playing this as niche.
![]() Brutal Slash vs
Brutal Slash vs ![]() Wild Slashes:
Wild Slashes: ![]() Brutal Slash is always better, largely due to it being a relevant dps gain in Single Target, unlike
Brutal Slash is always better, largely due to it being a relevant dps gain in Single Target, unlike ![]() Wild Slashes. That being said,
Wild Slashes. That being said, ![]() Wild Slashes has a straightforward way of playing, and is decent enough to comment on. Do NOT pair
Wild Slashes has a straightforward way of playing, and is decent enough to comment on. Do NOT pair ![]() Wild Slashes with
Wild Slashes with ![]() Double-Clawed Rake, these talents are anti-synergistic.
Double-Clawed Rake, these talents are anti-synergistic.
Section 3 Options Explained
![]() Bloodtalons vs
Bloodtalons vs ![]() Lion's Strength: I would almost always play
Lion's Strength: I would almost always play ![]() Bloodtalons. Optimizing
Bloodtalons. Optimizing ![]() Bloodtalons is a very small gain in single target, so even as a new player you will see ~2% more damage there. In AoE, the talents are much closer in overall value, and
Bloodtalons is a very small gain in single target, so even as a new player you will see ~2% more damage there. In AoE, the talents are much closer in overall value, and ![]() Lion's Strength even wins in burst AoE, so in that regard you can justify
Lion's Strength even wins in burst AoE, so in that regard you can justify ![]() Lion's Strength, especially since it is easier to play.
Lion's Strength, especially since it is easier to play.
![]() Adaptive Swarm: Good for both Hero trees, with the first point being one of the single best options you can take for pure single-target, and I would recommend running it almost all the time as Wildstalker. 2 points into
Adaptive Swarm: Good for both Hero trees, with the first point being one of the single best options you can take for pure single-target, and I would recommend running it almost all the time as Wildstalker. 2 points into ![]() Unbridled 'beekeeping' is where it gets really interesting if you want more cleave and AOE value, particularly on medium size pulls. However its value drops off on really large AOE.
Unbridled 'beekeeping' is where it gets really interesting if you want more cleave and AOE value, particularly on medium size pulls. However its value drops off on really large AOE.
![]() Carnivorous Instinct: Excellent burst option, with particular strength in large AOE, and it's one of the only talents in the bottom section that buffs Brutal Slash for example, which is stronger inside of
Carnivorous Instinct: Excellent burst option, with particular strength in large AOE, and it's one of the only talents in the bottom section that buffs Brutal Slash for example, which is stronger inside of ![]() Berserk. Gains more value if playing
Berserk. Gains more value if playing ![]() Raging Fury.
Raging Fury.
![]() Feral Frenzy: Solid single-target/prio option for both Hero trees, and decent in AOE as well, as it can help you weave
Feral Frenzy: Solid single-target/prio option for both Hero trees, and decent in AOE as well, as it can help you weave ![]() Ferocious Bite with the free combo points. Generally taken if you want more single-target, but already have
Ferocious Bite with the free combo points. Generally taken if you want more single-target, but already have ![]() Adaptive Swarm talented.
Adaptive Swarm talented.
![]() Rip & Tear vs
Rip & Tear vs ![]() Veinripper:
Veinripper: ![]() Rip & Tear offers more overall damage, though Veinripper nets more priority damage.
Rip & Tear offers more overall damage, though Veinripper nets more priority damage.
![]() Saber Jaws: A pure single-target option for Druid of the Claw, its value will vary significantly based on dungeon. Mutually exclusive with the
Saber Jaws: A pure single-target option for Druid of the Claw, its value will vary significantly based on dungeon. Mutually exclusive with the ![]() Rip & Tear vs
Rip & Tear vs ![]() Veinripper node.
Veinripper node.
Consumables
Potions
![]() Tempered Potion is your dps potion for every situation.
Tempered Potion is your dps potion for every situation.
![]() Algari Healing Potion is the only health potion available. That being said, if you find yourself equipped with an engineering crafted piece for whatever reason,
Algari Healing Potion is the only health potion available. That being said, if you find yourself equipped with an engineering crafted piece for whatever reason, ![]() Heartseeking Health Injector can situationally be a superior option.
Heartseeking Health Injector can situationally be a superior option.
Food
![]() Feast of the Midnight Masquerade,
Feast of the Midnight Masquerade, ![]() Feast of the Divine Day and
Feast of the Divine Day and ![]() Beledar's Bounty are all essentially equal, with
Beledar's Bounty are all essentially equal, with ![]() Beledar's Bounty being by far the cheapest option.
Beledar's Bounty being by far the cheapest option.
Phials
![]() Flask of Alchemical Chaos for every situation. Rarely, with
Flask of Alchemical Chaos for every situation. Rarely, with ![]() Signet of the Priory and/or
Signet of the Priory and/or ![]() Mechano-Core Amplifier,
Mechano-Core Amplifier, ![]() Flask of Tempered Mastery can be better.
Flask of Tempered Mastery can be better.
Weapon Oils/Stones
![]() Algari Mana Oil overtakes other options with 11.1 gear.
Algari Mana Oil overtakes other options with 11.1 gear.
Augment Rune
Gearing
Stat Priority
WARNING
Sim yourself using Raidbots Top Gear. Do not follow any stat priorities.
Gems and Enchants
| Slot | Gem/Enchant |
|---|---|
| Gems | 1x |
| Weapon | |
| Chest | |
| Cloak | |
| Legs | |
| Wrist | |
| Boots | |
| Ring | You should always sim your own character to determine what enchant to use in this slot. They tend to be very close. If you don't want to sim, |
Crafting
NOTE
The biggest question is whether or not to craft a weapon, or gamble on acquiring a myth track weapon early on. (for example ![]() Greasemonkey's Shift Stick from the first boss of the raid, if you'll enter Mythic quickly.) If you do get one, then skip crafting a weapon.
Greasemonkey's Shift Stick from the first boss of the raid, if you'll enter Mythic quickly.) If you do get one, then skip crafting a weapon.
Crafting Order:
 Charged Halberd (or any crafted 2h agi weapon) with
  Darkmoon Sigil: Ascension. If you already have a myth track weapon, you can skip this.
- Sim the best slot for your gear using
 Writhing Armor Banding (if you have weapon with Darkmoon Sigil: Ascension) or
  Dawnthread Lining.
 - Can continue doing the above. Ever since the crest requirement for crafted gear got nerfed this route is equally efficient in that regard.
Trinkets
These trinket lists are in rough order of strength, assuming the highest item level version of the items. You should always sim your own character to determine which trinkets you should equip.
NOTE
This is updated for the recent wave of buffs to trinkets that deal flat damage.
For use in Raid:
| Tier | Trinket | Notes |
|---|---|---|
| S Tier | 90s on-use trinket. Generally will hold this to pair with Berserk. On some fight timers where you hold Berserk, you can squeeze an extra use of this in between. | |
| The longer the fight, the more this pulls ahead of everything else. The shorter the fight, the more this falls behind. This ranking assumes a ~5minute fight. | ||
| 2 min on-use trinket. Pair this with Berserk. The value of this trinket is increased slightly if others in your group are running it. | ||
| Highly recommend doing your delve bounty/map and filling delve vault for this trinket if you don't have the above on myth track. | ||
| Doesn't matter when you use this for pure damage, just dont cap stacks and don't gimp other trinket cooldowns for it. | ||
| A Tier | This trinket is incredibly good during lust. Enough so that, in very short fights (sub 2 min), it is likely our best option. | |
| B Tier |
For use in Mythic+:
| Tier | Trinket | Notes |
|---|---|---|
| S Tier | 90s on-use trinket. Pair with Berserk | |
| Pair with Berserk. Value reduced slightly if nobody else in your group is running this. | ||
| A Tier | Superb as long as you can maintain a high amount of average stacks (10+ average) | |
| This loses value relative to raid because the timers don't align as nicely in a dungeon environment. | ||
| B Tier | ||
| moves up slightly if your other trinket is not an on-use |
WARNING
![]() Eye of Kezan is extremely dungeon and group dependent. I would recommend not playing this, unless you are confident in acquiring high combat uptime.
Eye of Kezan is extremely dungeon and group dependent. I would recommend not playing this, unless you are confident in acquiring high combat uptime.
Trinket FAQ
Q: How do I use stat on-use trinkets with ![]() Best-in-Slots equipped?
Best-in-Slots equipped?
A: You send your trinket with cooldowns, and then use ![]() Best-in-Slots with your next
Best-in-Slots with your next ![]() Tiger's Fury (with
Tiger's Fury (with ![]() Convoke the Spirits instead if you are running
Convoke the Spirits instead if you are running ![]() Ashamane's Guidance)
Ashamane's Guidance)
Q: Should we be playing double on-use with ![]() Signet of the Priory and
Signet of the Priory and ![]() House of Cards?
House of Cards?
A: No, usually we only play 1 on-use trinket. Though you should always sim just in case.
Q: How many buffs does ![]() Signet of the Priory assume?
Signet of the Priory assume?
A: By default, none. You can add the buffs yourself by pasting thewarwithin.signet_of_the_priory_party_stats=crit/haste/mastery/versatility into the Custom APL box of your sim. Remove whatever ally stat you dont want to sim.
Q: ![]() Mechano-Core Amplifier/
Mechano-Core Amplifier/![]() Suspicious Energy Drink is simming better than some of the higher item level stuff on this list for me, should I use it?
Suspicious Energy Drink is simming better than some of the higher item level stuff on this list for me, should I use it?
A: Absolutely. These trinkets are particularly potent for their item level.
Q: Why do damaging trinkets deal more damage as Wildstalker?
A: The Wildstalker Hero Talent ![]() Vigorous Creepers buffs non-feral damage as well, including damage from trinkets.
Vigorous Creepers buffs non-feral damage as well, including damage from trinkets.
Cyrce's Circlet
Yes we are still going to play this ring in 11.1, and it will be our best-in-slot.
Recommended Citrines
Thunder Citrine: Always play ![]() Stormbringer's Runed Citrine.
Stormbringer's Runed Citrine.
Sea Citrine: Always play ![]() Fathomdweller's Runed Citrine.
Fathomdweller's Runed Citrine.
Wind Citrine: Always play ![]() Windsinger's Runed Citrine.
Windsinger's Runed Citrine.
Miscellaneous
What is snapshotting?
Snapshotting refers to the process of continually ensuring that your strongest bleeds are ticking on your targets. The strength of feral bleed ticks is snapshotted (calculated) at the moment of application and lasts for the duration of the bleed. If certain buffs are active when the bleed is applied, such as ![]() Tiger's Fury, the damage of its snapshot will be stronger. A good feral player is aware of this and will weave between applying stronger bleeds and leaving currently ticking bleeds alone.
Tiger's Fury, the damage of its snapshot will be stronger. A good feral player is aware of this and will weave between applying stronger bleeds and leaving currently ticking bleeds alone.
Tracking the strength of different bleeds across multiple/changing mobs is notoriously difficult, so we recommend the use of Weak Aura bleed packages such as those found in dreamgrove.gg. All our WA packages follow the same general format:
- If the bleed's icon is highlighted in green or its number is higher than 100: this is a stronger bleed than the one you currently have active.
- If the bleed's icon is highlighted in grey or its number is equal to 100: equal value bleed
- If the bleed's icon is highlighted in red or its number is lower than 100: this is a weaker bleed than the one you currently have active.
Note: You will not necessarily upgrade every snapshot. Please review the rotation section.
Which bleeds snapshot which buffs?
| DoT | ||||
|---|---|---|---|---|
| Yes | Yes | No | No | |
| Yes | No | No | Yes | |
| Yes | No | Yes | No | |
| Yes | No | No | No | |
| First Jump Only | No | No | No | |
| Upgrades and extends | No | No | No |
TIP
![]() Pouncing Strikes can be applied via
Pouncing Strikes can be applied via ![]() Shadowmeld/
Shadowmeld/![]() Prowl/
Prowl/![]() Sudden Ambush
Sudden Ambush
A dot will ideally be applied only when 30% or less of the prior dot remains. This triggers a mechanic known as “pandemic,” which is common to most damage over time spells.
What is “pandemic range?”
This term refers to a DoT mechanic in WoW. The baseline duration of a DoT can be extended by up to 30% if a target is already affected by that DoT. Due to the 30% cap on extension, DoTs generally shouldn't be refreshed too early, as potential ticks will be lost. The ideal window of time to refresh a DoT is known as its “pandemic range.”
Let’s use an example. Consider a 10 second DoT:
- Refresh with 1s remaining: the new DoT will be 11s long (10s baseline duration + 1s from prior DoT)
- Refresh with 3s remaining: the new DoT will be 13s long (10s baseline duration + 3s from prior DoT)
- Refresh with 8s remaining: the new DoT will still be 13s long (10s baseline + up to 30% from prior DoT)
It is therefore most efficient to wait until 70% or more of your bleed has ticked to refresh its DoT.
Fun trivia: the name “pandemic” derives from an old warlock passive that was eventually integrated as a baseline feature of damage over time spells.
What is “clipping?”
Clipping refers to refreshing a dot prior to its pandemic window. Sometimes you will want to do this with Feral because of snapshotting and/or ![]() Bloodtalons.
Bloodtalons.
Macros
Here, we provide a list of helpful macros. These macros are not required, but using them may elevate your gameplay. (Note: These macros are not set in stone. Customize them as you see fit!)
Cast Ursol's Vortex at your cursor location (@cursor macro):
#showtooltip
/cast [@cursor] Ursol's Vortex
Use your trinket(s) and/or weapon at the same time as an ability:
Some trinkets and weapons should be used with a major cooldown. A lot of players will bind these items with Berserk.
- 13 is the top trinket slot
- 14 is the bottom trinket slot
- 16 is your weapon slot
If you would like to use all three items with Berserk, use this macro:
#showtooltip
/use 13
/use 14
/use 16
/cast Berserk
This macro may be modified. For example, the macro below only uses the 2nd trinket with Berserk:
#showtooltip
/use 14
/cast Berserk
Cast Entangling Roots on your mouseover target:
This macro casts Entangling Roots on your mouseover target. If your mouse is not hovering over a target, the macro instead casts Entangling Roots on your current target.
#showtooltip
/cast [@mouseover, harm, nodead] [] Entangling Roots
Dispel/Soothe on the same bind:
This is the classic help/harm macro, but using mouseovers as well.
#showtooltip
/cast [@mouseover, harm, nodead] Soothe; [@mouseover, help, nodead] Remove Corruption; [harm, nodead] Soothe; Remove Corruption
Skull Bash your Focus target:
This macro casts Skull Bash on your focus target. If you have not set a focus target, the macro instead casts Skull Bash on your current target.
We recommend creating a keybind that will assign a target as your focus with one click. This option can be found in the game's keybind settings.
#showtooltip
/cast [@focus, harm, nodead] [] skull bash
Cast Adaptive Swarm on your ally or enemy mouseover target:
This macro casts Adaptive Swarm on a friendly mouseover target. If your mouse is not hovering over a target, the macro instead casts Adaptive Swarm on your current target.
Many abilities that are cast on allies - Rejuvenation, Regrowth, Innervate, etc - may be macro'd in this fashion. To make those macros, simply replace the term "Adaptive Swarm" with your spell of choice. If you want mouseover to work for both friendly and enemy targets, replace 'help' with 'exists'. If you want it to only work on enemy targets, replace 'help' with 'harm'.
#showtooltip
/cast [@mouseover, help, nodead] [] Adaptive Swarm
Cast Rebirth on an ally:
This macro casts Rebirth on your current friendly but dead mouseover target. If your ally is alive, the macro instead casts Mark of the Wild.
#showtooltip
/cast [@mouseover, help, dead] Rebirth; Mark of the Wild
Why does my mouseover macro not work?
You probably have it bound to a mouse button, which doesn't allow mouseover macros by default. To fix this, you can use an addon like Clicked, or just map the mouse-button to a different key. Backtick (`)/Tilde (~) can also have this issue. If you don't have it bound to a mouse-button and it still doesn't work, then there is likely an issue with the macro itself. In this case, it's almost always the ommission of help, harm or exists in the brackets containing mouseover.
Useful WeakAura(s) and Addons
Full WeakAura Packages for Feral
To play feral competently, many variables must be tracked. A single WeakAura is not up to this task, so our contributors have spent many hours assembling full WA packages from individual WeakAuras.
Each package contains multiple WeakAuras that work with each other to help you understand what's happening in combat. No package is superior to the others in the list. We recommend you try out several, and settle on your favorite.
Common Standalone WeakAuras and Addons
None of these WeakAuras or Addons are required, but using them may elevate your gameplay.
Feral Bleed Power by Oi This WA will make it easier to track the power of your next bleed compared to the currently active one. For more details, check out the WA description.
Rake Plater mods by Sretnuh This links to a collection of Rake mods for the Plater addon. Their purpose is to help you track which targets have Rake at a glance. No listed mod is superior to the others. We recommend you try out several, and settle on your favorite.
Clearcasting Glows by Sretnuh
This WA generates a glowing icon on your ![]() Shred,
Shred, ![]() Thrash,
Thrash, ![]() Swipe and
Swipe and ![]() Brutal Slash buttons when
Brutal Slash buttons when ![]() Clearcasting procs. For more details, check out the WA description.
Clearcasting procs. For more details, check out the WA description.
Apex Predator's Craving by Marvel
This WA produces a glowing icon + sound cue when ![]() Apex Predator's Craving procs for a free bite. For more details, check out the WA description.
Apex Predator's Craving procs for a free bite. For more details, check out the WA description.
Adaptive Swarm Helper by KnewOne, updated by Drufearr
This WA assists with proper use of ![]() Adaptive Swarm. It also includes Unbridled Swarm support for casting on allies. For more details, check out the WA description.
Adaptive Swarm. It also includes Unbridled Swarm support for casting on allies. For more details, check out the WA description.
Bloodtalons Tracker from Fore's pack
This WA tracks your progress towards crucial procs of ![]() Bloodtalons.
Bloodtalons. ![]() Bloodtalons is procced when you cast three different combo point generation abilities within 4s. This WA displays the 4s timer. For more details, check out the WA description.
Bloodtalons is procced when you cast three different combo point generation abilities within 4s. This WA displays the 4s timer. For more details, check out the WA description.
Bloodtalons Tracker from Cheesey's pack
This WA is another alternative for tracking crucial procs of ![]() Bloodtalons. For more details, check out the WA description.
Bloodtalons. For more details, check out the WA description.
Focus Skull Bash This WA tracks when your Skull Bash interrupt is off cooldown and ready for use on your Focus target. For more details, check out the WA description.
Innervate Frame-glow (requires healer to whisper) by Drufearr This weakaura checks for a whisper input, (ie 'innervate me') and puts a glow on the whisperer's raid frame, alongside an icon telling you who to innervate. Also plays a sound when someone calls for innervate.